Seach this Blog

Linggo, Enero 8, 2012

List of Photoshop CS5 useful common keyboard shortcuts


Familiarization of keyboard shortcuts in any software makes your work fast, easy and comfortable, and that’s is true with Adobe Photoshop CS5 provides a bunch of keyboard shortcuts to help accomplish your task in an effective way.
Now here is the list of available default keyboard shortcuts that can be useful to familiarized arranged according to group. 


ENVIRONMENT 

Shift+Tab  hide and un-hide all Photoshop panels.
Space Bar  hand tool that use to navigate over images.
}  Re-size the brush tip from small to big
Re-size the brush tip from big to small
Shift+}  adjust the hardness of the brush to strong
Shift+{  adjust the hardness of the brush to soft
Ctrl+~  Switch view of multiple image open in a tabbed.


TOOLBAR

D  Reset the default color of the toolbox the black for foreground color and white for background color.
X  Switch the background color of the toolbox to foreground color and vice versa.
L  Lasso Tool
M  Marquee Tool
W  Quick Selection Tool
C  Crop Tool
Eye Dropper Tool
]  Healing Brush Tool
B  Brush Tool
S  Clone Stamp Tool
Y  History Brush Tool
E  Eraser Tool
G Gradient Tool
O  Dodge Tool
P   Pen Tool
T  Text Tool
A  Path Selection Tool
K  3D Object Tool
N  Camera Tool
H  Hand Tool
R  Rotate View Tool


SELECTION

Ctrl+D Deselect
Shift+Ctrl+D Reselect
Alt +drag the mouse to constraint the square shape
Shift+drag the mouse to constraint the circle shape
Shift+Ctrl+I  Inverse selection
Alt+Ctrl+A Select All Layer
Alt+Ctrl+R Refine Mask


FILTER

Shift+Ctrl+R Lens Correction
Shift+Ctrl+X Liquify
Alt+Ctrl+V Vanishing Point


VIEW

Ctrl+Y View Proof Colors
Ctrl++  Zoom
Ctrl+-  Zoom out
Ctrl+0  Fit on Screen
Ctrl+1  Fit Actual Fixels
Ctrl+H Show Extras
Ctrl+’ Show Grid
Ctrl+R Show Rulers
Shift+Ctrl+; Snap
Alt+Ctrl+; Lock Guide


WINDOWS

Alt+F9 Action
F5 Brush
F6 Color
F8 Info.
F7 Layers


LAYER

Shift+Ctrl+N  Create new layer
Ctrl+J  Copy a layer
Shift+Ctrl+J  Cut a layer
Ctrl+G Group a layer, using this try to select the layers you want to group by pressing Ctrl key then click the number of layers you want to group.
 Shift+ Ctrl+G Ungroup layers.
Ctrl+E Merge layers
Shift+ Ctrl+E Merge visible
Shift+ Ctrl+[ Send to back
Shift+ Ctrl+] Send to front
Ctrl+] Bring forward
Ctrl+[ Bring backward
Alt+Ctrl+G Create clipping mask


IMAGE

Ctrl+L To access the levels dialog box
Ctrl+M To access the curves dialog box
Ctrl+U To access the hue/saturation dialog box
Ctrl+B To access the color balance dialog box
Alt+Ctrl+Shift+B To access the curves dialog box
Ctrl+I Invert
Shift+Ctrl+U Desaturate
Alt+Ctrl+I To access image size dialog box
Alt+Ctrl+I To access canvas size dialog box


EDITING

Ctrl+Z Undo the delete state
Shift+Ctrl+Z Step forward
Ctrl+V Paste
Shift+ Ctrl+V paste special
Shift+F5 Fill
Alt+Shift+Ctrl+C Content aware scale
Ctrl+T Free transform
Shift+Ctrl+K Access Color Settings Dialog box
Alt+Shift+Ctrl+K Access Keyboard Shortcuts dialog box
Alt+Shift+Ctrl+K Access Menus dialog box
Ctrl+K Access Preferences dialog box


FILE

Ctrl+N  Open New Document Dialog box
Ctrl+O  Open Document Dialog box
Alt+Ctrl+O Browse in Bridge
Ctrl+W Close Document
Alt+Ctrl+W Close All Document
Shift+Ctrl+W Close the Document and go to Bridge
Ctrl+S Save
Shift+Ctrl+S Save As
F12 Revert
Alt+Shift+Ctrl+I File Info.
Ctrl+Q Exit


SELECTION

Ctrl+D Deselect
Shift+Ctrl+D Reselect
Alt +Drag the mouse to constraint the square shape
Shift+drag the mouse to constraint the circle shape
Shift+Ctrl+I Inverse selection
Alt+Ctrl+A Select All Layer
Alt+Ctrl+R Refine Mask


FILTER

Shift+Ctrl+R Lens Correction
Shift+Ctrl+X Liquify
Alt+Ctrl+V Vanishing Point


But if you are not comfortable using the common shortcuts in Adobe Photoshop CS5 you can customized your own keyboard shortcuts by simply go to edit menu and click keyboard shortcuts or press Alt+Shift+Ctrl+K.Key.


then this is keyboard shortcuts dialog box.


you can select from three (3) where you can put shortcuts from menu, panel and tools then to modify just follow the instruction below.


 but before proceeding save first the set name or the shortcut key configuration 


from save dialog box you can name it what you want


you may now set your own keyboard shortcuts by following the instructions below.


if the shortcut keys you set is already in-used message below will appear, and you had an option to proceed that will remove the shortcut to its original function and be set to which you choose. after settings all done just click the button Accept to take effect. but make sure the name of your set or shortcut configuration is set on default like what we did we name that config. My Photoshop Personal Shortcuts.


you can save keyboard shortcuts configuration as many as you want. to switch from other sets just select the available name at the list.  


Lunes, Enero 2, 2012

Configuring the .Net app.config to access Database via LAN

A sample configuration of vb.net application settings that allows to communicate via Local Area Network, using MSSQL Server Authentication mode.

Look for app.config in your project and open it then find the code that's look like below.

Just edit the IP Address which the MSSQL SEVER installed then the name of MSSQL SEVER supply the User Name and Password.

(click the picture to in-large)

Note: the above configuration will only works if the MSSQL SEVER has been configured to allows remote access.

Biyernes, Disyembre 16, 2011

VB.NET 2005 Debugging and fixing error issue

I' was a vb 6.0 programmer for about  year 7 but since I know that the application in vb 6.0 although can be installed in a new version windows operating system like Windows Vista, Windows 7 but eventually the compatibility issue will be a problem since Microsoft already drop its support in Visual Basic 6.0 last 2001 if I not mistaken, then the application written in vb 6.0 will become isolated eventually. That's why I decided ship from vb.net. Obviously is different environment although most of the vb 6.0 functionality are still intact in dotnet framework, but i can say that its different.

My first application I built in vb.net is a customized accounting system of a certain company, but during my development I encounter problems during debugging. and it cost me a lot of this type of error as a new to the framework.

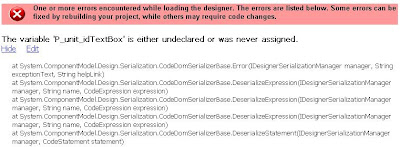
in this picture a sample error generated during the build of my application, and it is intentional for the sake of illustration. this will occur if you made some changes in your code and windows form vice versa, that doesn't much each other. for instance I accidentally deleted the textbox name P_unit_idTextBox, that still used in my application then the error generate as shown here:


the problem is how do i fixed the error, and then restore the textbox on my form. if  I can't open the form. some suggested to edit the "designed.vb" of the form or the .resx but as a novice its to dangerous to do.

what I do in this problem is that i always make a backup of my application from time to time that I make changes to it. so that if that error occurred I simply delete the module or form that is affected, and then from the back-up file I enable to restore it, the time this type of error occurred again.

Huwebes, Disyembre 15, 2011

function code that convert number to words(vb6 to vb.net)

Public Function NumToText(ByVal dblValue As Double) As String
Static ones(0 To 9) As String
Static teens(0 To 9) As String
Static tens(0 To 9) As String
Static thousands(0 To 4) As String
Dim i, x, y As Integer, nPosition As Integer
Dim nDigit As Integer, bAllZeros As Integer
Dim strResult As String, strTemp As String, strTemp1 As String
Dim tmpBuff As String


ones(0) = "zero"
ones(1) = "one"
ones(2) = "two"
ones(3) = "three"
ones(4) = "four"
ones(5) = "five"
ones(6) = "six"
ones(7) = "seven"
ones(8) = "eight"
ones(9) = "nine"

teens(0) = "ten"
teens(1) = "eleven"
teens(2) = "twelve"
teens(3) = "thirteen"
teens(4) = "fourteen"
teens(5) = "fifteen"
teens(6) = "sixteen"
teens(7) = "seventeen"
teens(8) = "eighteen"
teens(9) = "nineteen"

tens(0) = ""
tens(1) = "ten"
tens(2) = "twenty"
tens(3) = "thirty"
tens(4) = "forty"
tens(5) = "fifty"
tens(6) = "sixty"
tens(7) = "seventy"
tens(8) = "eighty"
tens(9) = "ninty"

thousands(0) = ""
thousands(1) = "thousand"
thousands(2) = "million"
thousands(3) = "billion"
thousands(4) = "trillion"

'Trap errors
On Error GoTo NumToTextError

'Get fractional part
strResult = Format((dblValue - Int(dblValue)) * 100)
'Convert rest to string and process each digit
strTemp = CStr(Int(dblValue))

'Iterate through string
For i = Len(strTemp) To 1 Step -1
'Get value of this digit
nDigit = Val(Mid$(strTemp, i, 1))
'Get column position
nPosition = (Len(strTemp) - i) + 1
'Action depends on 1's, 10's or 100's column
Select Case (nPosition Mod 3)
Case 1 '1's position
bAllZeros = False
If i = 1 Then
tmpBuff = ones(nDigit) & " "
ElseIf Mid$(strTemp, i - 1, 1) = "1" Then
tmpBuff = teens(nDigit) & " "
i = i - 1 'Skip tens position
ElseIf nDigit > 0 Then
tmpBuff = ones(nDigit) & " "
Else
'If next 10s & 100s columns are also
'zero, then don't show 'thousands'
bAllZeros = True
If i > 1 Then
If Mid$(strTemp, i - 1, 1) <> "0" Then
bAllZeros = False
End If
End If
If i > 2 Then
If Mid$(strTemp, i - 2, 1) <> "0" Then
bAllZeros = False
End If
End If
tmpBuff = ""
End If
If bAllZeros = False And nPosition > 1 Then
tmpBuff = tmpBuff & thousands(nPosition / 3) & " "
End If
strResult = tmpBuff & strResult
Case 2 'Tens position
If nDigit > 0 Then
strResult = tens(nDigit) & " " & strResult
End If
Case 0 'Hundreds position
If nDigit > 0 Then
strResult = ones(nDigit) & " hundred " & strResult
End If
End Select
Next i
'Convert first letter to upper case
If Len(strResult) > 0 Then
strResult = UCase$(Left$(strResult, 1)) & Mid$(strResult, 2)
End If

EndNumToText:

'Return result
y = Len(strResult)
strTemp1 = Mid(strResult, 1, y - 1)

NumToText = strTemp1 & "only"
Exit Function

NumToTextError:
strResult = "#Error#"
Resume EndNumToText
End Function

Manipulate Your MS Word 2007 Document Using Shortcut Keys

Sometimes it is more comfortable to navigate and manipulate Microsoft Word Document using Keyboard instead of mouse specially if you're accessing tools that contained inside the menu and sub-menus and so on, but even the very accessible command buttons like bold, italic, underline etc. to be honest it is really comfortable to Press CTRL+B for bold, CTRL+I for Italic and CTRL+U for Underline. Much more for Copy, Cut and Paste command if you will not used each shortcut keys for it like CTRL+C for Copy, CTRL+X for Cut and CTRL+V for Paste you need to right-click select from the menu every time you will impose a command and its very tiring process but thanks for shortcut keys it helps a lot.

But despite of the benefits some users choose not to use this shortcut keys because it's difficult to remember the combination keys in the keyboard and it is true from the previous version of Microsoft Word like 1997, 2000, 2003, but for 2007 version up this problem were solved, so no need for the user to remember those all keys combination only one key to remember the Alt, Press the Alt key and all those shortcut keys will be visible at the toolbar menus above.

here is will happen when you press Alt key and the shortcut keys will be revealed from main menu.


say for instance you press Alt+H for Home, notice that another shortcut keys were revealed  


and if you choose particular tools like what I did I press the key Alt+FC then from the tools has another shortcut keys as we see.


try to practice some shortcut keys combination so we can use it confidently.

How To Reference Cells in Other Excel Files

Here is the problem if we maintained lots of data and report in Microsoft Excel, and we use several files to handle that data say for instance we use separate file for the list of inventory in the previous period or quarter and want to sum-up the inventory of the previous figure to the current figure using the two excel files.

Here is the formula that will help you.  

Like my previous post about How to Reference Cells in Other Sheet http://toxiod.blogspot.com/2011/12/how-to-reference-microsoft-excel-cells.html their is also a way on How To Reference Cells in Other Excel Files by using the formula similar to the previous example we just add the path where the excel files reside plus the name of the particular file. here is the formula ('The Path of the File\File Name\[Sheet Name]Sheet Name' Exclamation Point Cell Name)

Say for instance if we want to get the sum of the figure that contained from two separate excel files named Book1 Sheet1 Cell A1 and Book2 Sheet1 Cell A1 and want to display the result to other excel file named Book0.

here is the actual formula assuming that our file resided from Drive C

=SUM('C:\Book1\[Sheet2]Sheet2'!A1+'C:\Book2\[Sheet3]Sheet3'!A1)

How To Reference Microsoft Excel Cells into Other Worksheets

Here is the formula on how to reference cell in other worksheets:

Name of Sheet exclamation point Name of Cell. How can we use it?

Its like for example you have three sheets in your excel file called Sheet1,Sheet2,Sheet3 and we need to sum-up the figure from Sheet2 cell named A1 and Sheet3 cell named A1 from Sheet1 cell named A1. the actual formula would be like this =Sum(Sheet2!A1+Sheet3!A1)


 this is the result